
CUSTOM FONTS 🔥 MOST POPULAR
How to install custom fonts
There are two ways to install custom fonts on your WordPress website. We recommend the plugin method for most users, while the manual method is intended for users comfortable working with theme files and custom code.
Estimated time: 10–15 minutes
Intermediate Tutorial
Before you begin
This tutorial includes editing theme files when using the manual installation method. We recommend creating a backup of your website before making any code changes.


Kadence Pro Users
Kadence Pro includes a built-in Custom Fonts feature, so you don’t need to use the installation methods below.
Choose your method
Choose Your Installation Method

Plugin Method
Recommended for most users. Install custom fonts without editing theme files.

Manual Installation
Best for advanced users who are comfortable editing theme files and working with code.
Plugin Method
Install with the Use Any Font Plugin
The Use Any Font plugin is the quickest way to install custom fonts.
The free version allows you to upload one custom font. If you need additional fonts, you can upgrade to Use Any Font Pro for approximately $10.
Install the Plugin
Go to Plugins → Add New
Search for Use Any Font
Click Install → Activate
Generate Your API Key
Open Use any font in the left sidebar of your WordPress Dashboard
Click Generate Free Lite/Test API Key
Then Select Verify to activate your Free License
Upload your font
Open Upload Font tab and click Upload Fonts.
Choose Enter a name for your font.
Click Choose File to upload your font file.
Save Your font is now uploaded and ready to use.
Manual Method
How to install your custom Font
Before you begin
It is important to understand that installing fonts without a plugin is a more advanced step and requires editing theme files. If you are not comfortable with this tutorial, we recommend using the plugin method above.
On This page
Access your theme folder
Add your font files
Add the font to your stylesheets
Almost there
Now we’ll register the font so WordPress can use it.
Modify the Functions File
Confirm your font has been added

Before you start
Installing fonts without a plugin is more advanced and requires editing your theme files.
You will be using a file manager and if something goes wrong in the Functions.php file your site could break, until you restore the functions.php file.
We recommend using the plugin method above for most users.
Always make a backup of your site before you make changes.
Access your theme folder.
Open your website using your hosting provider’s File Manager or an SFTP/FTP client such as FileZilla.
Navigate to:
public_html → wp-content → themes
For this tutorial, we’re using the Hello Iris theme as our example.
Add Your Font Files
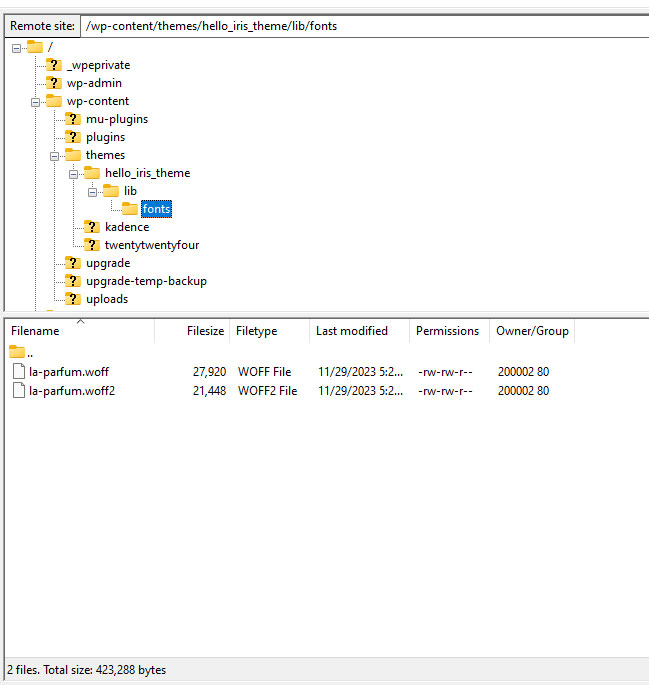
Open your theme’s Fonts folder, located here:Theme Files → Lib → Fonts
Upload your font files to this folder. For the best browser compatibility, upload both the .woff and .woff2 versions of your font whenever possible.
Add Your Font to the Style Sheets
Your theme uses two style sheets:
style.css controls the front end of your website.
custom-editor-style.css controls how fonts appear inside the WordPress editor.
You’ll add an @font-face rule to both files.
1. Add the code to style.css
Open Style Sheet (style.css) and paste the code below.
2. Add the code to custom-editor-style.css
Open lib → custom-editor-style.css in your theme files and paste the code below into this file.
Note: The file path is different in this file. Notice it uses fonts/ instead of lib/fonts/
Things to Replace:
When using the code above, update these values:
Replace both filenames with the exact filenames you uploaded in Step 02.
Register Your Font in functions.php
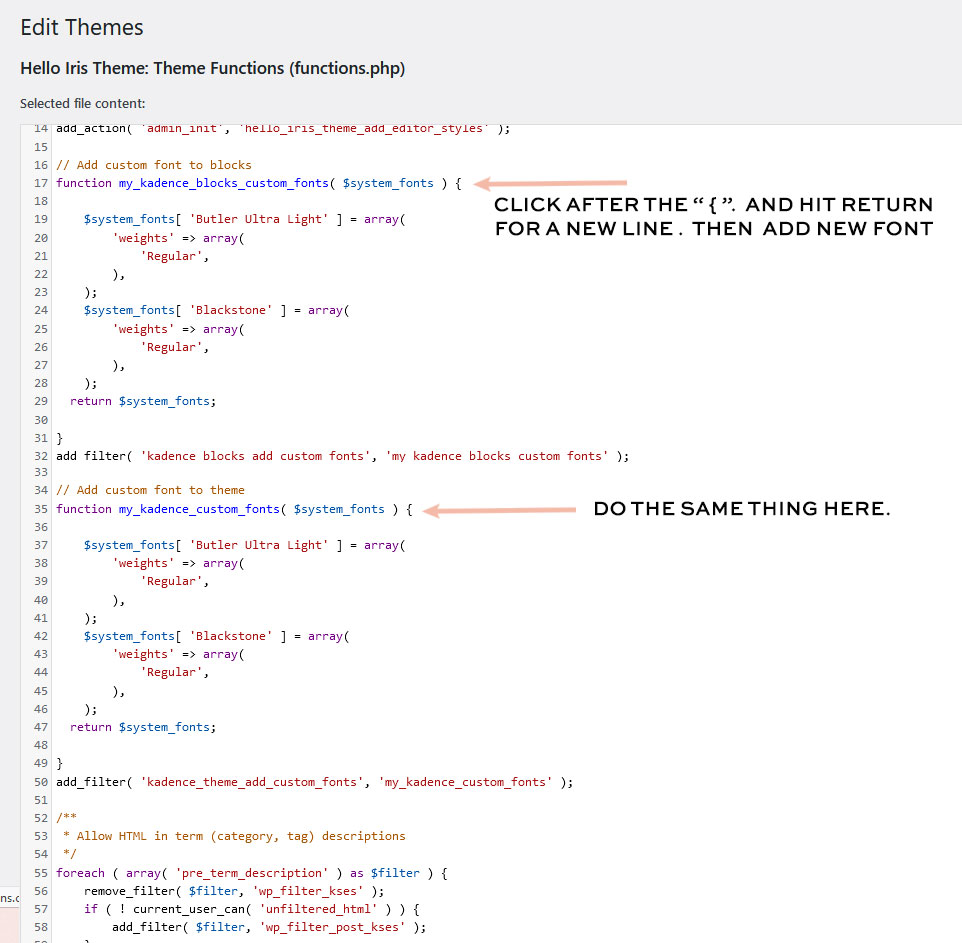
To make your new font available in the WordPress editor and Customizer, you’ll need to register it in your theme’s functions.php file.
If you’re using a Hello You Designs theme, your theme already includes custom font registrations. You’ll simply add your new font alongside the existing code.
1. Add the Following Code
Paste the code below into the section that registers custom fonts.
$system_fonts[ 'YOUR FONT NAME' ] = array(
	'weights' => array(
		'Regular',
	),
);
2. Things to Replace
Update these values before saving:
3. Confirm Your Changes
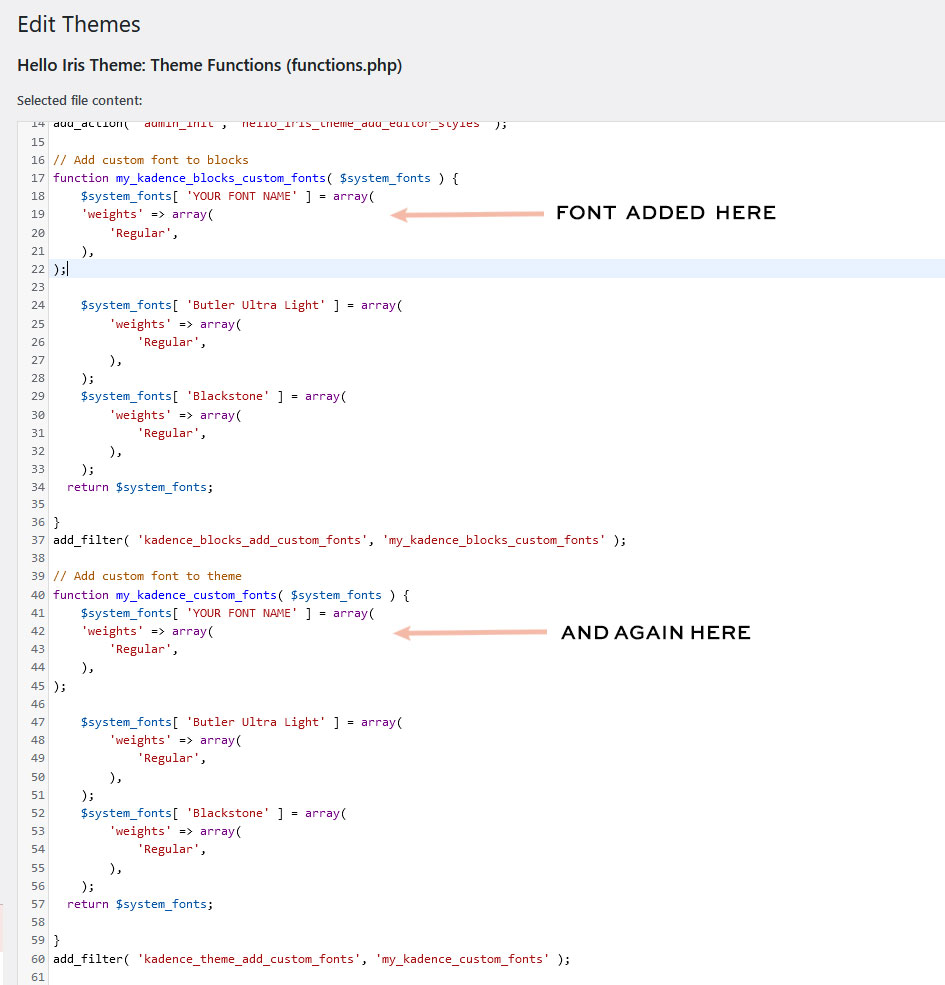
Once your font has been added, your functions.php file should look similar to the example image.
If everything looks correct, save the file.

Step 05
You’re finished!
If everything was completed successfully, your new font should now be available throughout your website.
Don’t see your font yet?
Before troubleshooting, clear any caches that may still be serving an older version of your website, including

your browser cache

aNY cACHING pLUGINS

hOSTING OR cdn cACHE
Still having trouble?
Double-check these common issues:

Still need help?
We’re happy to help! If you couldn’t find the answer you’re looking for, send us a support ticket and we’ll get back to you as soon as possible.