
Theme Documentation
Hello Lily
Your go-to resource for everything about your theme. Find setup guides, customization tips, and answers to common questions.
Theme Overview
Here you will find the basics to run your theme like the demo. We have also included additional details like the fonts, and demo colors.
Plugins
* are required for theme function
Requirements
WordPress 6.3+
PHP 8.2+
Required Plugins x2
Colors
#C6B0A2
Palette 1
#625751
Palette 2
#7B4D4D
Palette 3
#1D1D1D
Palette 4
#302B27
Palette 5
#625751
Palette 6
#C6B0A2
Palette 7
#F0E7E0
Palette 8
#F7F5F4
Palette 9
#ffffff
Palette 10
Fonts


Advanced Header Settings
Customize the Hello Lily Header
Hello Lily includes transparent header and alternate logo options, along with several navigation settings unique to the theme. Use the guides on the right to configure each feature step by step.
Sometimes after importing the demo, the Transparent Header settings may not match the demo exactly. If this happens, simply update the settings below.
Enabling Disable on Pages and Disable on Posts allows you to choose which individual pages or posts use the transparent header from the page or post settings.
If you prefer the transparent header to be enabled across your entire site by default, you can leave these options disabled and adjust the page spacing settings as needed for your layout.
Go to Appearance → Customize → Header → Transparent Header
Enable Transparent Header.
Enable the following options:
One of the great features of the Kadence framework is the ability to use a separate logo for your Transparent Header. This allows you to display one logo when your navigation has a solid background and a different logo when it appears over a hero image or banner.
For example, you might use a dark logo for your standard header and a white logo for your transparent header.
Because these are two separate logo settings, updating your primary logo will not automatically update the Transparent Header logo (and vice versa). This gives you complete control over how your branding appears in different areas of your site.
Go to Appearance → Customize → Header → Transparent Header
From this screen, you can upload the logo you would like to display when the Transparent Header is active. If you prefer to use the same logo throughout your site, simply disable the Use Different Logo for Transparent Header option.
To update your primary site logo, return to Appearance → Customize → Header and edit the logo in the main Header settings.
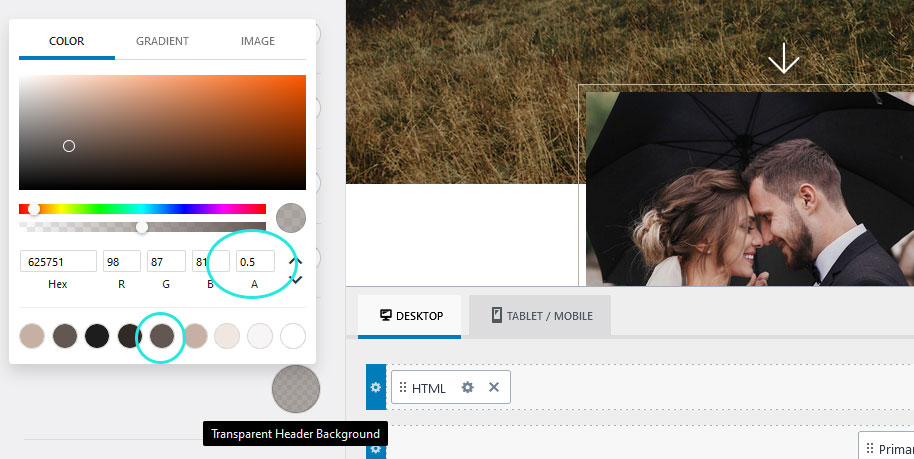
Go to Appearance → Customize → Header → Transparent Header.
Step 1 – Open the Design tab. This is where you can customize the navigation colors and background.
Step 2 – Adjust the navigation colors. The three color options control the Default, Hover, and Active states of your navigation links.
Step 3 – Set the navigation background color. In the demo, we used Palette 2 with 50% opacity to create the semi-transparent background effect.
Note: If you change your Global Palette colors later, the navigation background will not automatically update if you’ve applied transparency. Because the background color has been customized with an opacity value, you’ll need to manually select the new palette color and reapply the desired transparency.
Go to Appearance → Customize → Header
The Top Announcement Bar is the section at the top of the page that displays the message:
“Attention Grabbing Offer Goes Here… SIGN UP!”
Step 1 – Click the blue gear icon for the Top Announcement Bar.
Step 2 – Open the Design tab.
Step 3 – Choose the background color from your Global Palette and adjust the opacity to create the desired transparency. The demo uses the mauve palette color with 50% opacity.
Note: If you change your Global Palette colors later, the Top Announcement Bar background will not automatically update if you’ve applied transparency. Because the color has been customized with an opacity value, you’ll need to manually select the new palette color and reapply the desired transparency.
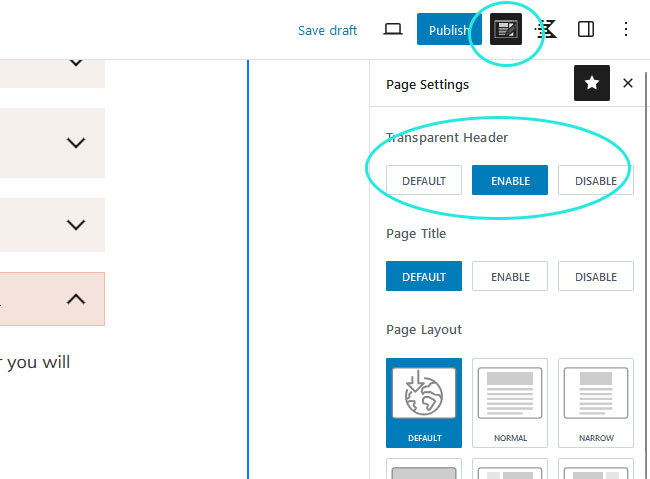
The Transparent Header can be enabled on individual pages and posts, giving you full control over where it appears throughout your website.
Step 1 – Open the page or post you would like to edit.
Step 2 – In the top-right corner of the editor, click the Page Settings icon (the notepad with a pencil).
Step 3 – Under Transparent Header, select Enable.
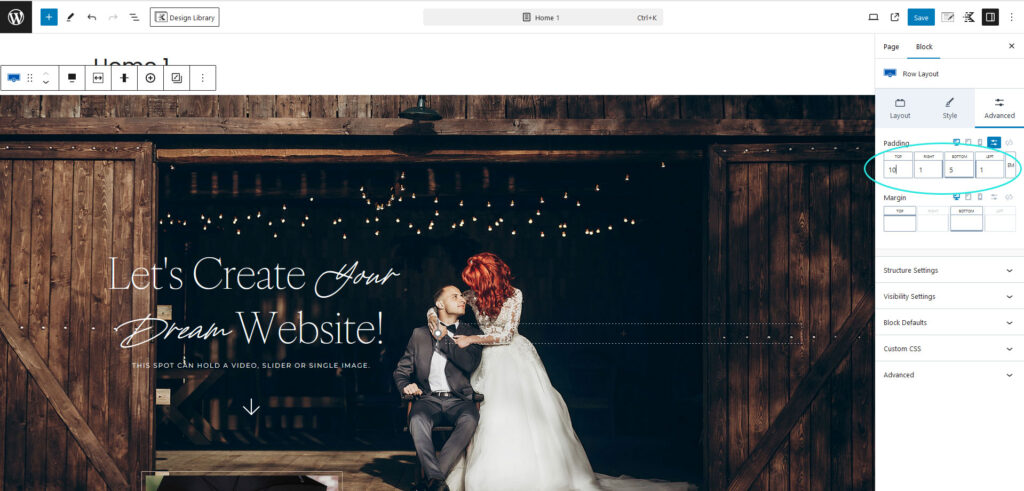
Important: When using a Transparent Header, the first block on the page should include enough top padding so your content doesn’t sit behind the navigation.
We recommend using 10–12em of top padding for hero sections. If you’re using a section from the Design Library, the recommended top padding has already been applied for you.
Custom Code
Built-In Styling Options
Use these optional CSS Classes to add theme specific design details to your layouts. These classes are completely optional and can be used in the Additional CSS Class(es) field for any compatible element in the editor.

What it does
Let’s you mix in your accent font with a header style.
Example

How to use it
Create your heading. Then select the words you would like to be script and apply the Italic styling to those words only.
To change the color, select the script text and from the menu bar above the text, select the arrow ( ⌵ ), and then highlight. There you can choose an accent color.
What it does
Adds a decorative accent border around your images to help them stand out.
Example

How to use it
Click on the image you would like to add the border to.
In the editor to the right, click on Advanced and then the Advanced Tab.
In the Additional CSS Class(es) field, add the class you would like.
Click save and view your page.

Styling Help
The color is coded to Palatte #6
Click to copy.
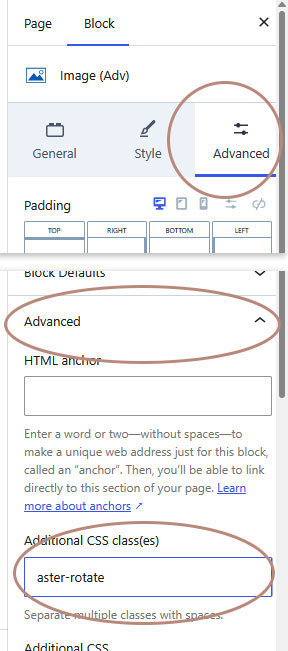
What it does
Adds a decorative rotation effect to your images for extra visual interest.
Example

How to use it
Select the image you want to add the rotation to.
In the editor to the right, click on Advanced and then the Advanced Tab.
In the Additional CSS Class(es) field, add the class aster-rotate
Click save and view your page.
CSS Classes
Add this class to apply the accent. Simply click to copy.
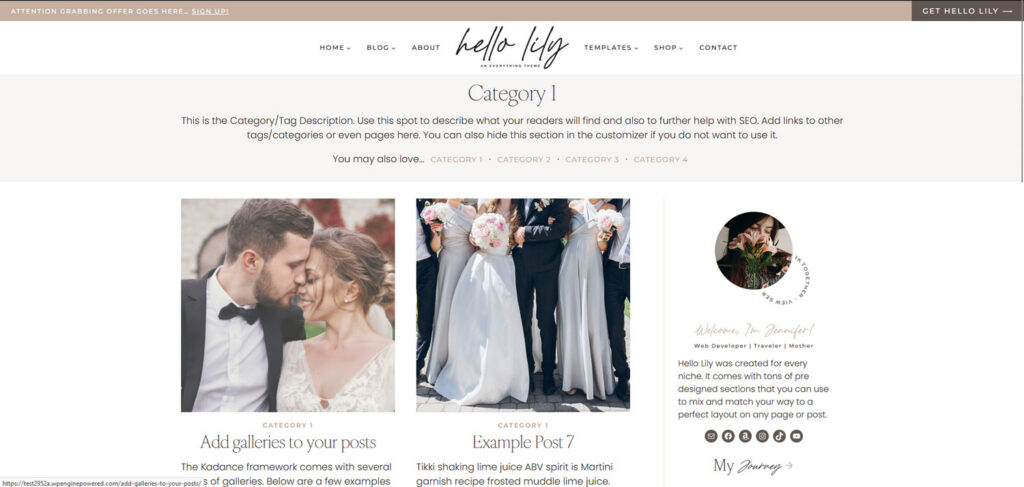
What it does
You can add a custom description to both your Category and Tag archive pages. The description field also supports HTML, allowing you to add styled headings and navigation links.
Example
How to use it
Go to Posts → Categories or Posts → Tags, then click Edit on the archive you want to customize.
In the Description field, enter your content. If you’d like to include links, you’ll need to use HTML.
Save and preview your page
The <span> tag below will automatically use your Heading Font, while the links will inherit your Primary Navigation Font. You can copy and paste the link code as many times as needed.
Heading Example
<span>You may also love...</span>Link Example
Remove the · after your final link, or replace it with another separator if you’d like a different style.
<a href="YOUR LINK HERE">Dessert</a> ·Full Example
<span>You may also love...</span>

<a href="YOUR LINK HERE">Dessert</a> ·
<a href="YOUR LINK HERE">Dinner</a> ·
<a href="YOUR LINK HERE">Drinks</a>
VIDEO TUTORIAL
Learn to Use Your Block Library
Learn how to use your Block Library with confidence. This video covers browsing your library, adding blocks to your pages, editing content, moving sections, and customizing layouts to fit your website.
QUICK START
Quick Answers & Tutorials
Find quick answers to the questions we hear most often, or browse step-by-step tutorials for more detailed guidance.
Everything you need to customize
your theme from start to finish.
Popular Tutorials
Step-by-step guides
The most common tutorials our users find helpful.
Popular Questions
Quick Answers
Browse answers to the questions users ask most often.

Still need help?
We’re happy to help! If you couldn’t find the answer you’re looking for, send us a support ticket and we’ll get back to you as soon as possible.
Changelog
Follow the evolution of your theme. Every new feature, improvement, and bug fix will be documented here, so you can quickly see what’s changed.
Found an issue or have an idea for a future release? We’d love to hear from you.